Showing posts with label directions. Show all posts

Thursday, April 3, 2014

Episode 8: DisVACAney!

PLANNING A WDW VACATION!

FOLLOW ME LINKS


SHOW LINKS


SHOW NOTES


Initial planning


-Buy a vacation planning book

-Do your research and create a budget

-Select your dates (hardest part)

-Select any Dining Reservations

-Transportation arrangements

-take your time off of work


Down the road (6 months to go)


-Do your research (listen to podcasts, books etc)

-Make your dining reservation (180 days out)

-If you don't get them; check on them everyday

-Bringing family members create a FB group.

-Make arrangements for your home (mail, pets, checking in, etc.)

-Make a schedule/ itinerary for the days you are spending there as well as for traveling

-Rides/shows you really want to see (top 3 for both)

-Revisit Your Budget. (include money for souvenirs)
make sure you have vacation days set at work


Almost there (3 months to go Where I am now)

-Confirm reservations (hotel, dining, flights, etc.)
-Confirm people taking care of the home front.
-Revisit Itinerary
-Call and ask any questions (accessibility, Magic bands, fast passes)
-Make sure everyone going, with you, is on the same page. 
-Go shopping for clothes start packing
-If you are making t-shirts or in my case shoes now is the time
-Plan food, car activities
-Create your 10 day out checklist


Stressing (less than 10 days)

-Confirm everything again (hotel, dining, tickets, etc., pets)
go over Itinerary
-Pack your bag (create checklist)
-Get home ready (throw out things that spoil, unplug electronics, etc.)
-Traveling arrangements in order (cars oil change, trans. to airport, etc.)
-Food for car ride
-activities, movies
-Finalize your itinerary
-Electronics charged and ready

Wednesday, March 5, 2014

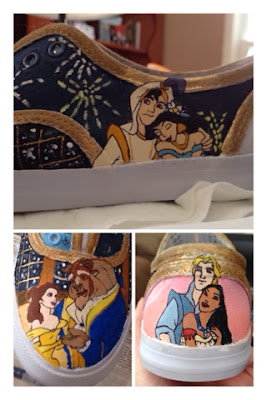
DisLIZneyfied: Custom Disney Shoes! (Tutorial)


Disney Inspired Shoes


What you will need

1. White canvas shoes
2. modge podge
3. two fine black permanent markers
4. Various fine tip paint brushes
5. Paint marker color of your choosing (optional)
6. Various paint colors (acrylic seems to work best)
7. pencil and eraser


Before starting this tutorial check out this tutorial on how-to transfer a photo to canvas.  This will work for your canvas shoes.
http://abeautifulmess.typepad.com/my_weblog/2011/10/make-your-own-canvas-portrait.html

Characters to shoe

1. Select the characters you would like
2. Determine where each character will go (you can use the trim as a way to seperate the spaces as I did)
3. Measure each space of the shoe and be sure character fits in the space.
4. Using the "make-your-own-canvas-portrait" transfer the picture to the shoe (this will take some time)
5. When picture is transfered use the permanent pen to trace all of the black lines.


Note: I would do this part of the tutorial first for all characters you plan to put on the shoes


Remember you can paint over anything you do not like.
My hand drawn John Smith and Pocahontas, before discovering modge podge. (Absolutely terrible)

First coat of white paint/ second coat of white paint. (Hand drawn gone!)


Painting a Background

Before this step if you plan on using the trim to seperate spaces and want to outline it. Directions for this will be at the bottem of this tutorial.

Note: Be sure to do this before painting your characters; this will help if you make mistakes (I know this is hard because I myself am impatient) Use a picture to get an idea of what you want and match colors. (Unless you are really creative)
My mistake I basically had to go back and repaint both characters all over again.


1. Use a pencil to sketch out your background
2. Start painting your back ground to your likely 
3. Use your best judgment for the type of brush you should use.
4. When mixing colors you just have to play around with the colors you have; to get the color you want. 

Tips: Pay attention to fine details.
Use good lighting.

You can paint all the backgrounds of each section or you can just work each section at a time.

Painting Characters

Note: Be sure to paint characters after background.

Steps are similar to that of painting the background.
Extra Step: Re-trace the black lines (you might want to reprint you picture to remember where the lines are)

Tips:
1. Use a very fine paint brush for small detail
2. Use a permanent marker for eyes, lips, and any other fine detail.
3. If you don't like how somthing turned out repaint it.
4. Use a thin layer of modge podge over each character to protect it. (if you don't, when you seal the shoe the permanent marker will run)
5. For items that are transparent (Tiana's vail), Paint what is suppose do be behind it then use a little bit of water mixed into the paint to make it lighter.
6. BE CREATIVE!

Final Step: Use a spray paint sealent to protect entire shoe. (Read directions before using)

Share your shoes with me!


Coloring the Trim

1.Use Modge Podge and coat the trim with a thin layer (this will make the paint pen really shine)

Left side without Modge Podge/ Right side with Modge Podge.

2. Use a paint pen color of your liking all over the trim. (read directions on pen)
2. Let dry before Painting Background.

Shoes I made for my sister!


Shoes I made for my niece


Custom Frozen Shoes by Fan of the Blog